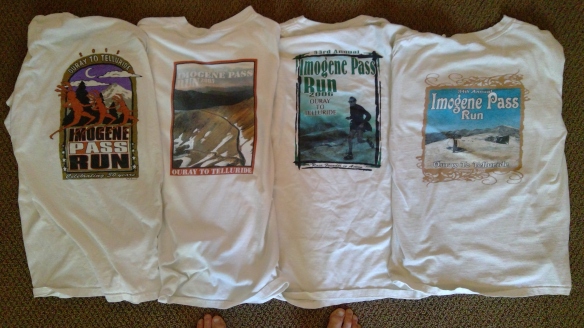
The Imogene Pass Run is one of my favorite mountain races. It’s challenging and the scenery is stunning without the crowding of Pikes. I’ve raced it four times, all top-20 finishes, finishing between 2:37 – 2:45 on the full course (1:52 on the weather shortened course in 2006). Although my experience up front may be a lot different than the bulk of IPRs, I have heard from lots of friends from all parts of the pack.
In this I will talk about:
- Where to stay
- Course
- Training
- Equipment
- Strategy
Where to stay
Ouray or Telluride? You’ll hear different opinions. There is no one right answer.
Ouray – Pros: You can sleep later. You can use your own (hotel) bathroom rather than having to wait in line for the porta-potties.
Cons: Long ride back after the finish. Will have to miss much of the post-race festivities.
Telluride – Pros: Easy walk from the finish. You can shower and change, and still participate in the post race festivities. Your family can sleep in and watch you finish.
Cons: You have to get up extra early to catch the bus or drive. Parking is difficult in Ouray. If you drive yourself, you then have to take the bus back to get your car (don’t drive yourself, take the bus).
I prefer staying in Telluride. The human body performs better after a few hours – time for your lungs and blood vessels to expand and your muscles to warm up. I like being close to my bed, shower, clean clothes after the finish.
Course
The race website, http://live-raceresults.com/imogene/course/ has a very detailed course description that I don’t need to repeat. However, there are a few things to note that will help.
You are allowed to take shortcuts on the way up. There are two to consider, and one that’s almost a must. You should check out the first two before the start:
0.32mi – Most of the front runners will cut the hairpin turn (red) rather than following the road around (yellow). It’s not a big short cut, and may not matter once it gets more crowded in the middle of the pack.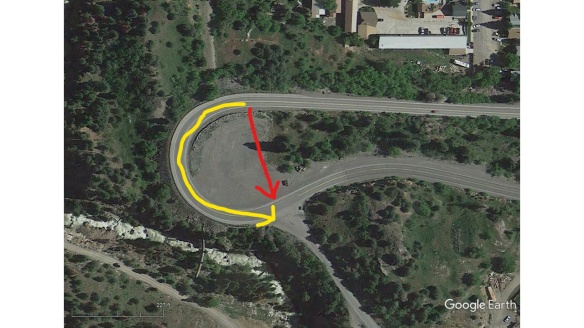
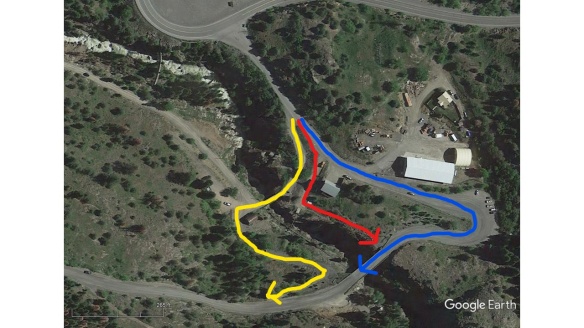
0.44mi – Just after entering the dirt road, there are three choices, one more than the two mentioned in the course description:
- Go right, dropping down across the bridge, then left up a small single track (yellow). Most of the top runners will take this route.
- Just after the bridge, as the road curves left, stay straight, veering off the road, and climb up the left side of the ravine (red).
- Follow the main road wide around to the left (blue). While the first two are much shorter, they are narrow and will back up. As the back-ups grow, this option becomes more viable.
8.0mi – About 1/4 mi past the UCB aid station, the smoother jeep road will curve wide to the right, then back to the left (yellow). The old road goes straight up a rocky section (red). The 8mi cone is on this straight section. Going straight can save most a minute or two.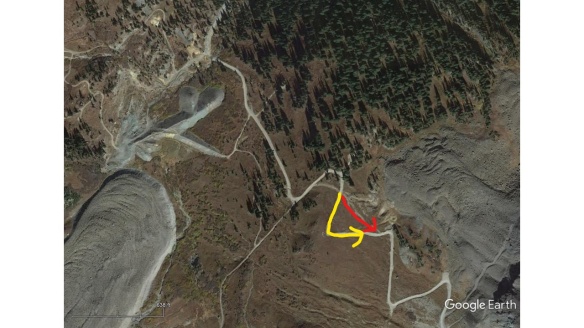
The start of the course can almost be called gradual, 910’ in the first 3mi. It’s a wide and smooth 2WD road. The road then gets steeper up to the LCB aid station, 1,000’+ over that 2.1mi stretch, still fairly smooth. You drop down from the aid station, then the real climbing begins. It’s almost 14% from there to the summit, with a few pitches >20%. There’s a false summit about 1mi from the top. From there, you should be able to see and hear the people at the top. There are some giant rollers in the last uphill mile. There’s a short, single track section just before the summit. It might back up there. Just relax and go with the flow.
The start of the descent is the steepest and most technical. It drops at almost 16% in the first ~2mi, the dirt can be loose, rutted, and there can be some black ice (in 2005, I slipped on black ice, perhaps 30 seconds down from the summit, and broke a finger). After the first downhill aid station the descent is more moderate, ~10%, and the footing much better.
At mile 13, you have ~0.7mi of almost flat road. Remember to increase your effort here because gravity won’t be helping much.
At the end of the dirt road, you turn left and have 2-½ steep, paved blocks to the finish. The transition from dirt to pavement, the different feel, can be tricky, so be alert to prevent falls. As the course description states, “the second greatest number of injury falls in the race occur in the 2.5 block stretch just ahead of you.”
Training – Train for the hills, not the altitude
The altitude will affect you, especially coming from near sea level, but you can’t train for it. Anything that you might think you can do to train for altitude is something you should be doing anyway. Intervals and hills will get you faster and stronger, but will not cause your physiology to adapt to altitude.
Heat training can help. This could include bundling up even when it’s warm or training in a sauna. The additional blood required to dissipate heat reduces the available blood to the working muscles, somewhat simulating altitude. Just be careful to hydrate well if you do this. Otherwise, there isn’t much you can do about altitude other than getting there early or buying an altitude tent (or doping).
Train for the hills, both up and down. For uphill, include short, hill sprints, not just long grinds. Short, powerful sprints build strength and efficiency that you don’t get with slower and longer runs.
- Uphill striders. Always get a good warm up before sprints and intervals. Go into the sprint with a few skips and/or high knees (simulates a strong uphill stride). Start with a few easy strides, building to full speed. Slightly exaggerate a strong knee drive parallel to the slope, forceful backward arm drive with the same leg going forward (helps drive the knee forward), and leg turnover. Go near all out about 20-30 seconds, a few strides past where your legs start to tighten up, your stride starts to slow, and form starts to break down.
- Uphill sprints – Warm up and start similar to the striders. I like to take a few easy strides on flat at the bottom of a hill. Go all out for 6-10 seconds. Keeping it short engages different muscle fibers and energy systems than > 10 sec.
- Uphill bounding. Long, powerful, gliding strides, getting hang time. Focus on a powerful, explosive stride. When you land, compress, then explode into the next glide as quickly as possible.
Downhill – Good downhill running can gain you 10+ minutes on the descent, reduce the risk of falling, forestall late race fatigue, and reduce post-race soreness. Good downhill running also translates into better and stronger flat running. You don’t need a lot of downhill running to prepare the muscles, though it does take time and practice to improve your form and efficiency. Read more at https://runuphillracing.wordpress.com/2018/04/26/benefits-of-downhill-training/
Practice hiking. Being a strong and efficient hiker is a skill that doesn’t necessarily come from running. Practice both for power and form. As with running, train using some short bursts in addition to longer hikes.
You often see people bent over, pushing on their thighs with their arms as the hike uphill. I am not a fan of that technique. That closes off your hips, limiting your stride, and tends to compress your lungs, limiting your oxygen intake. Instead, I prefer staying tall, keeping your hips and shoulders open. Pump your arms back to help drive your legs forward, and keep your stride relatively short and quick.
Practice switching between hiking and running. You want to make the transition smooth and quick. Learn to feel when to switch, what it feels like when the walking is too easy or the running too hard.
If you live where there are no or few hills, you need to be creative. For uphills, you can use a treadmill and stair climber. Focus more on short, uphill sprints than long grinds. For that, there are lots of options including bleachers, building stairwells, highway overpasses, multi-level parking garages, and berms.
Downhill training can be more difficult to accomplish without hills. I’ve heard of people putting the back of a treadmill up on blocks. Run down stairs. As said above, you don’t need a lot of downhill training, so if you can drive to a hill once a week or two, that will help. Some more tips from last year’s Pike Peak Marathon female masters winner, a flatlander.
https://trailrunnermag.com/training/trail-tips/training-for-mountain-running-from-sea-level.html
Equipment
Shoes, shirt, pants. Everything else depends.
Road or trail shoes? It’s a personal preference. The terrain isn’t that technical (see my course notes above about the downhill), so some might do better with something like a cushioned marathon training shoe to reduce leg fatigue on the descent. This depends on how comfortable you are on dirt.
Hat, gloves and jacket depend on the weather and how fast you are. High mountain weather can be unpredictable. Even though it may be clear at the start, severe conditions may show up by the time you get to the summit. However, by checking the last possible forecast, you may get an indication that severe weather is very unlikely, allowing you to consider leaving some gear at home or going lighter. I typically start with a long sleeve over a short sleeve (I hate being cold), then tie it around my waist several minutes into the race. Only once, in four times, have I needed to put it back on higher up.
Water – carry as little as you need. Water is heavy. 70oz, ~2 liters, weighs ~4-1/2 lbs. Weight will have a bigger impact uphill than on flats. If you’re planning to carry a hydration pack, consider not filling the bladder or bottles all the way, using the aid station fluids, and filling yours as needed. Bladders are harder to fill on the run than bottles.
Personally, I carry a bottle near empty from the start (just enough at the start to keep my mouth from getting dry) in a hip pack. I’ll primarily use the aid stations on the way up. At UCB, I’ll fill the bottle ~½-way and transfer it to a hand strap. Even towards the front of the pack, it’s a long trek from there to the summit. I’ll put a little more in at the summit so I don’t have to slow or stop on the way down.
Should you carry a pack? It depends on how much gear and clothing you need to carry. Some things to consider before deciding to use a pack. Gloves, light hat, and gels/bars can be carried in a pocket fairly easily. I’ve use a bike jersey at the race. As long as what you’re carrying is light, it won’t bounce. Long sleeve and jacket can be tied around your waist. To tie a full zip around your waist, unzip it not quite all the way, tie the arms, then zip it up as much as possible and tuck the arms under the zippered part.
Strategy
Crowding is minimal, so you don’t have to rush the start to avoid getting bogged down. Run your own race.
Although they say that your finish time will be similar to a road marathon, that can vary widely. Good hill runners, both up and down, should be able to run significantly faster here than in a road marathon. For example, Matt Carpenter’s course record of 2:05:56 is a lot faster than his road marathon PR (and faster than the marathon world record at that time). My slowest time at IPR (2:45) is faster than my marathon PR (2:53).
Take advantage of the aid stations. Take a little extra time to eat and drink, then carry just enough with you to get to the next aid station. Water is heavy. You don’t need to carry enough for the whole race.
Minimize switching back and forth between running and hiking. Switching takes extra energy. It’s not worth switching if it’s just for a few strides.
Run as much of it as you can. A slow 18min/mi run is faster than a brisk 25min/mi hike.
Practice power hiking. Practice running downhill.
Make sure your laces are snug for the descent. Consider using lace locks or similar with static, non-elastic laces, and pulling them snug at the top.
Most important:
- Have fun.
- Smile.
- Soak in the scenery.
- Gain strength from your fellow racers.
- Embrace the challenge.
- Embrace the weather.
- Thank the volunteers.
- Smile some more.